TweetDeck: Twitter’s lesser-known sidekick
If, like a lot of charities, you use Twitter, you’ll probably agree that it can be a lot of work to get the most out of it. (Not using Twitter yet? Check out our guide to getting started.)
Thankfully, Twitter seems to agree as well, which is why they also offer TweetDeck – a highly-customisable dashboard aimed at empowering the user, full of lots of features which will make your life on Twitter a lot easier. It’s even free too!
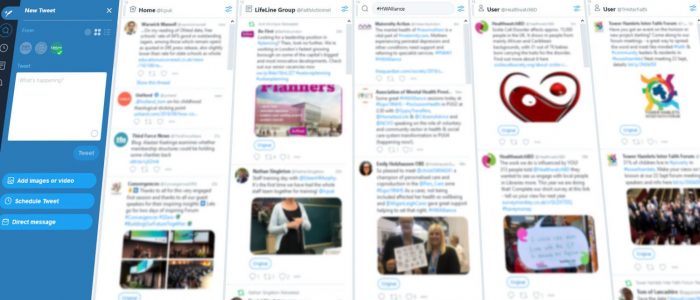
All you need to use TweetDeck is your Twitter account – simply head over to tweetdeck.twitter.com and log in. Once you’ve logged in, you’ll see something similar to the below.
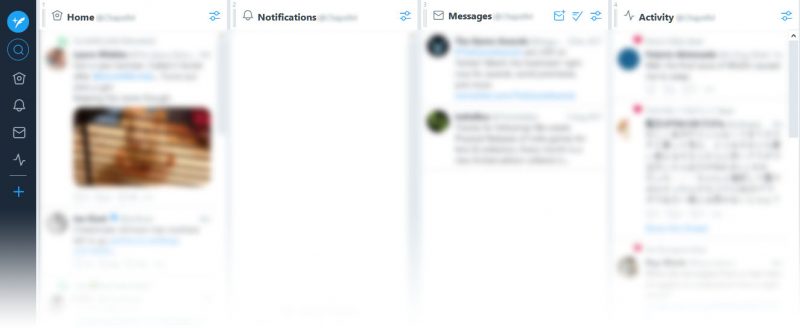
As you can see, TweetDeck uses columns to arrange and display information to you. TweetDeck will show a few columns by default, giving you access to most of Twitter’s basic functions, all in one compact view – your timeline, notifications, messages, as well as the activity of the people you’re following.
However, there are a lot more columns than these available to you, giving you quick at-a-glance access to useful information – want real-time updates when your favourite news source Tweets something new? See who’s posting on that hashtag you’re trying out? Or interested in different trending topics? There’s a column for that.
Columns
Okay, let’s try adding a new column to your dashboard!
- To get started, simply hit the New column button on the left sidebar, and you’ll be presented with a selection of columns.

- We’ll cover each of these in a bit, but for now, choose User – this lets you see a person’s Tweets.
- On the next screen, you can choose your own account – if you want to keep an eye on what you’ve been Tweeting – or you can use the search box to find a specific user to watch. For example, if you’re interested in the latest news, try searching for @BBCNews.
- Then, hit the big blue Add column button to finish. You’ll see your new column added to the end of your existing columns, showing the latest Tweets from your chosen user as they happen!
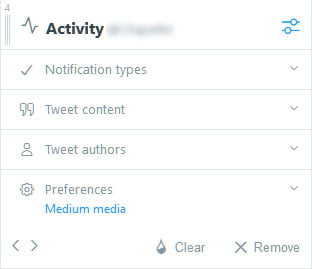
With any column, you can customise it even further, by clicking the Options icon on the right side of the column’s header. The exact options vary by column type, so try it out for each one. You can also rearrange your columns by clicking the < > arrows in the options, or by dragging the triple-line ‘handle’ on the left side of the column’s header.
Here’s all the column types you can use:
| Home | Shows your own Timeline (Tweets from people you follow). |
| User | Shows Tweets from any user. |
| Notifications | Shows your notifications. |
| Search | Shows real-time results from a Twitter search. e.g. see the latest Tweets for a particular hashtag |
| List | Shows Tweets from users added to a List (see below for more info) |
| Collection | Shows a Collection of Tweets (a public hand-picked set of tweets). You can make a new Collection here, or show one that’s been created by someone else. |
| Trending | Shows Trending topics, same as on Twitter itself. Can be set to show Trends customised for you, or general Trends in a region. |
| Likes | Shows Tweets liked by a particular user. |
| Messages | Shows your Direct Messages. |
| Followers | Shows any Tweets mentioning you. |
| Scheduled | Shows your scheduled tweets. (See below for more info) |
| Activity | Shows what the people you follow are liking etc. |
Scheduling tweets
This is easily one of the best features of TweetDeck – Tweeting into the future! Well, close enough – if you’ve got some Tweets you send out regularly, or you’re planning a co-ordinated push of something new, being able to line everything up in advance is sure to be a lifesaver.
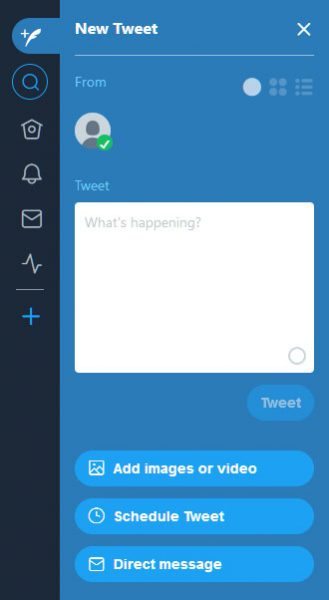 Start composing a new Tweet in TweetDeck (new blue quill icon in the top-left), and you’ll see the Schedule Tweet option below the Add images button. Hit that button and you can choose the exact date and time for your Tweet to go out – as simple as that.
Use the Scheduled column to track everything you’ve already scheduled. You can even go back and edit the Tweets you’ve got lined up by clicking the pencil icon on them.
There’s two caveats to scheduling Tweets to be aware:
- You can schedule Tweets with images, but you can’t edit them afterwards – if you want to change the time/date or text of an image tweet, you’ll have to delete it and remake from scratch.
- You can’t schedule Tweets with videos at all.
Lists
Lists are actually a standard Twitter feature, but not one a lot of people know about. In simple terms, a List allows you to group different users together and see all of their Tweets in one place.
To make a list, you’ll need to go to the Lists section on Twitter (not TweetDeck) and hit the New button at the top. Then you just need to give it a name, an optional description, and select whether to make it private or not.
Note: if you make a list public, it will be visible on your profile; anyone you add to it will be notified; and people can subscribe to it, which is like they were following each person on the list (e.g. they’ll see Tweets from list members as part of their Timeline).
Once you’ve got your list(s), you just need to view someone’s profile, click the three-dots icon and choose ‘Add/Remove from Lists’ from the menu. When you add this List to TweetDeck, you’ll see all the Tweets from the Lists’ members. Not sure what to use Lists for?
- Add all your staff/volunteers to a List, so you can engage and Retweet them.
- You can do the same for partner organisations etc. as well.
- Get your favourite trusted news sources together into one easy feed.
- Collect important local voices so you always have your finger on the pulse.
Multiple accounts
Another great feature of TweetDeck is that you can use all of these features to look after multiple Twitter accounts at the same time – you can do everything for all the accounts you control without having to constantly log in and out all the time.
Head over to TweetDeck’s Accounts section, and look for the “Link another account you own” option at the bottom – you’ll have to supply the login details for your other Twitter accounts. Once they’re linked, you can Tweet, use columns, and do pretty much everything for each account in one place.
Then, when Tweeting via TweetDeck, you can quickly change which account you’re Tweeting from by clicking it’s avatar at the top of the New Tweet panel.
Conclusion
I hope you’ve found this guide helpful. While TweetDeck can seem daunting at first, the time you can save by having the info you need at your fingertips really adds up. If you’d like to let me know how you get on, or if there’s any topics you’d like us to cover in future, you can reach me at chris.miller@faithaction.net.